Newsletter
RSS

Blog posts tagged with 'Visual Studio'

Building, Debugging and Testing Services in C# with the Crawler-Lib Framework

The Back-End Service Components are designed to allow to code back-end services that can be flexible hosted as windows service, Linux demon and in the cloud. But they allow also to test and debug services on the local machine in a uncommon way. It is a flexible middle way between monolithic hard coded back-end services and back-end as a service (BaaS) providers. Backend as a Service and Software as a Service providers couple couple two things that are very different: Modularization of the back-end and the hosting of the back-end. The Crawler-Lib service infrastructure prevents from a hosting provider lock in. It just brings the benefits of modularization and configuration to the back-end development. You choose the hosting of your back-end yourself.

Structure and Building Blocks

The service is build with several components and completely configured with the App.config configuration file. The idea behind this is to develop a service on the developer machine without to worry about deployment and hosting.

Crawler-Lib Service Stack

Hosts

The flexible configuration of hosts allows to deploy the service in different ways. There is a Windows Service host, a Linux demon host and cloud hosting is also possible. But more important, there is a WinForms Service Testing Host (NuGet package) which allows to set up a development and testing environment with ease.

Modules

The service infrastructure is designed to use service modules as composition block. As a user and developer you divide your back-end service into modules. Several predefined modules are in the release chain. Most important the Crawler-Lib Engine module, which integrates generalized task processing capabilities in the back-end service. But also a generalized WCF host to set up WCF endpoints just in the configuration. Standardization of additional back-end components will follow.

Databases

In conjunction with an upcoming storage operation processor the databases are the encapsulation and massive performance optimization of any kind of storage in a back-end service.

Components

Inversion of Control is used to decouple the service components. During the service startup the modules and database are wired. The modules and databases register its types and instances in certain phases of the service startup and resolve the needed components in a later phase. So the modules are containers for components.

Development

In classic service development the service itself is often monolithic and contains huge functionality in just one DLL or executable. The Crawler-Lib Service approach is similar to decoupled patterns often used in front-ends and BaaS platforms. It encourages the developer to divide the service functionality in small components and assemble them in handy modules with a exact specified functionality.

The most important change to classical service development is that the functionality is integrated in form of basically independent modules which provide and consume components. The infrastructure for a new service project is simply added as NuGet packages into a class library project in Visual Studio. Due to the component oriented infrastructure and the modularization non trivial projects should be split in several components and modules. This is both: Architectural structuration and a smooth way to put large or multiple teams on the project. It is very agile and supports also a wide range of project management and development mythologies like Test Driven Development, Scrum and so on.

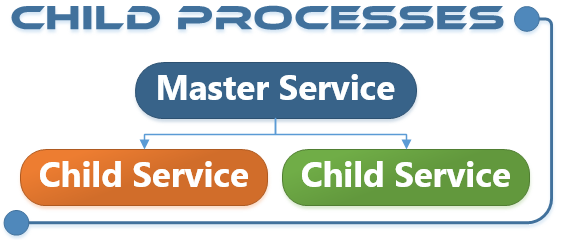
Different concepts can be combined to build a flexible infrastructure. For example child processes are integrated by default. This allows a master service so start and control child services. This can be used  to separate critical components from the master process, to stop and restart child processes when they crash or when they are no longer needed. The mixing of 32Bit and 64 Bit processes is also possible to use legacy 32Bit components.

Crawler-Lib Service Child Processes

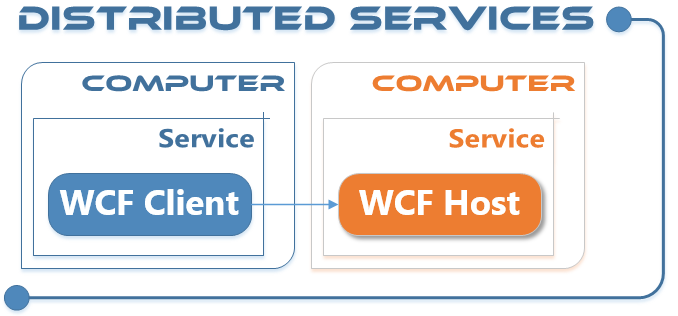
Distributed services can be easily implemented using WCF. As mentioned a full featured WCF host module and a matching WCF client component are already in the release pipeline. So it will becaome easy to develop distributed computing back-ends like rendering farms or crawler farms.

Crawler-Lib Distributed Services

Testing

Due to the flexible hosting capabilities it is easy to test a service. As mentioned above Crawler-Lib provides the Service Testing Host which is a console host with a WinForms GUI testing frontend. It allows to interact with the running service and trigger functions and test code. This is especially important when a complex service has a very long startup time. Instead of starting the service over and over again to test some functionality, we can edit and execute C# test code while the service is running.

There is also no need to upload you service to any platform for testing purposes. Testing is possible on the developer machine or on a continuous integration server.

Deployment

Like other .NET applications the service deployment is mainly XML configuration (App.config) and XCOPY deployment. A little integration stuff must be done on the platforms, like installing a windows service or adding the demon to the Linux startup. This can be done with using the platform specific tools like PowerShell or BASH. In the future we will provide packages for this which can be installed with the platform specific package tools like a Chocolatey, APT (apt-get) or the upcoming OneGet (Windows Management Framework 5.0).

Building NHunspell with PowerShell Build Tools

The PowerShell Build Tools are a free toolbox for build, test and deployment automation. The Build Tools combine XML configuration and PowerShell scripting in a new way to get the best of both worlds. NHunspell is a free wrapper for the Open Office Spell Checker Hunspell. Although NHunspell is a small project, it has a rather complex build and deployment workflow due to its native assemblies. We want to make this a bit easier so we switched the NHunspell build process to our new PowerShell based Build Tools. This is a real word use case which demonstrates a lot of the features.

NHunspell Build and Deployment

These are the steps that should be performed during a NHunspell build:

  1. Version Update
    Update all version strings in the solution to match the current build
  2. Compile the 32Bit Native DLL
  3. Compile the 64Bit Native DLL
  4. Compile the NHunspell Assembly
  5. Check the Files
    Check if all files are compiled and have the correct version resource
  6. Run the Unit Tests
  7. Create Zip Files
  8. Create NuGet Packages
  9. Test Deploy the Packages

So theses steps are automated using the PowerShell Build Tools.

PowerShell Build Tools in Action

 In this Video we show how NHunspell is build from PowerShell, within Visual Studio and on a Jenkins Build Server. It also shows how the build configuration can be edited and debugged.

Watch directtly on Youtube unter  Building the NHunspell Spell Checker with PowerShell Build Tools

 Build Configuration

The PowerShell Build Tools use a XML configuration file with the default name BuildConfig.xml. Here are the most important parts from the NHunspell  BuildConfig.xml:

XML Declaration

<?xml version="1.0" encoding="utf-8"?>
<!-- Build configuration for NHunspell -->
<BuildConfig xmlns="http://www.crawler-lib.net/build-tools"
xmlns:xsi="http://www.w3.org/2001/XMLSchema-instance"
xsi:schemaLocation="http://www.crawler-lib.net/build-tools http://download.crawler-lib.net/BuildTools/BuildConfig.xsd?action=view">

This XML declaration links to the current build tools schema definition and can be used to enable IntelliSense in Visual Studio.

Build Labeling

<Label>
  <BuildRevisionTimestamp/>
</Label>

The Build is labeled with the Build/Revision Timestamp tool. It works the same way as assemblies are versioned when *.* is specified as build and revision numbers.

Credentials for the Build Steps

<Credentials>
<Plain>
NuGetFeed=http://buildserver:8050/nuget/Test
NuGetApiKey=b763316f-25c2-4d17-bf0a-1c22e071eb05
</Plain>
</Credentials>

The credentials section allows to specify credentials for the use in the build steps later.

Solutions and Versions

<Solutions>
  <!-- The NHunspell solution to build, not to be confused with a visual studio solution -->
  <Solution Name="NHunspell">
  <Version>
    <AppendLabel>1.2</AppendLabel>
  </Version>
  ...

The PowerShell Build Tools are able to build a bunch of solutions during one build. The typical use case for this are solutions that need to have the same build label, but use different versioning. The versioning tool is specified for each solution and in ths sase it appends simply the build label to a fully qualified version.

    Build Sequences

<BuildSequences>

The build sequences are collections of build steps that can be executed to get to a certain stage in the build process. The PowerShell Build Tools use an incremental approach to get a build done. There is a special sequence called “Clear-Build” that clears the current build and forces an completely new build.

New-Build Sequence  

<BuildSequence Name="New-Build">
<!-- Patching the version of the projects to the current build version -->
<Autover Path="..HunspellWindowsHunspellWindows.sln" />
<Autover Path="NHunspell.sln" />
<!-- Compiling the native hunspell DLLs for Windows -->
<MSBuild Path="..HunspellWindowsHunspellWindows.sln" Configuration="Release" Platform="x86" />
<MSBuild Path="..HunspellWindowsHunspellWindows.sln" Configuration="Release" Platform="x64" />
<!-- Compiling NHunspell itself -->
<MSBuild Path="NHunspell.sln" Configuration="Release" Platform="Any CPU" />
<!-- Test if all files exist, have the correct file and product versions and are newly build --> 
<VerifyFile Path="UnitTestsbinreleaseHunspellx86.dll" FileVersion="true" ProductVersion="true" New="true"/>
<VerifyFile Path="UnitTestsbinreleaseHunspellx86.pdb" FileVersion="false" ProductVersion="false" New="true"/>
<VerifyFile Path="UnitTestsbinreleaseHunspellx64.dll" FileVersion="true" ProductVersion="true" New="true"/>
<VerifyFile Path="UnitTestsbinreleaseHunspellx64.pdb" FileVersion="false" ProductVersion="false" New="true"/>
<VerifyFile Path="UnitTestsbinreleaseNHunspell.dll" FileVersion="true" ProductVersion="true" New="true"/>
<VerifyFile Path="UnitTestsbinreleaseNHunspell.pdb" FileVersion="false" ProductVersion="false" New="true"/>
<VerifyFile Path="UnitTestsbinreleaseUnitTests.exe" FileVersion="true" ProductVersion="true" New="true"/> 
</BuildSequence>

The NHunspell build uses the New-Build Sequence to patch the versions of all projects in the solutions with the Autover tool. After that the native DLLs and NHunspell is compiled using MSBuild. Least it is checked if the generated files are new and if they have the correct version.  

Test-Build Sequence

<BuildSequence Name="Test-Build" Depends="New-Build" NewBuild="false">
<!-- Performing several tests with the new files -->
<NUnit Path="UnitTestsbinreleaseUnitTests.exe" />
<FxCop Path="UnitTestsbinreleaseNHunspell.dll" /> 
</BuildSequence> 

The Test-Build Sequence runs NUnit and FxCop to test NHunspell. The Test-Build sequence depends on the New-Build sequence. If the build is clear, the Build Tools will execute the New-Build sequence first. If there is a current build with a successful New-Build sequence, the Test-Build sequence will use the current build and perform the tests on the already available build results. This concept allows to modularize the steps and cuts down the time needed to develop a certain build sequence.  

Complete-Build Sequence

<BuildSequence Name="Complete-Build" Depends="Test-Build" NewBuild="false">
<!-- Make a zipped release package -->
<Zip Path="UnitTestsbinreleaseHunspellx86.dll" Target="Hunspellx86.dll" Output="NHunspell.$($context.PackageVersion).zip" />
<Zip Path="UnitTestsbinreleaseHunspellx86.pdb" Target="Hunspellx86.pdb" Output="NHunspell.$($context.PackageVersion).zip" />
<Zip Path="UnitTestsbinreleaseHunspellx64.dll" Target="Hunspellx64.dll" Output="NHunspell.$($context.PackageVersion).zip" />
<Zip Path="UnitTestsbinreleaseHunspellx64.pdb" Target="Hunspellx64.pdb" Output="NHunspell.$($context.PackageVersion).zip" />
<Zip Path="UnitTestsbinreleaseNHunspell.dll" Target="NHunspell.dll" Output="NHunspell.$($context.PackageVersion).zip" />
<Zip Path="UnitTestsbinreleaseNHunspell.pdb" Target="NHunspell.pdb" Output="NHunspell.$($context.PackageVersion).zip" />
<!-- Write Release Info file --> 
<AppendText Output="NHunspell.$($context.PackageVersion).zip.info.xml">
<![CDATA[<?xml version=`"1.0`" encoding=`"utf-8`" ?>
<infos>
<summary>NHunspell Release Version $($context.Version)</summary>
<description>
<a href=`"http://www.crawler-lib.net/nhunspell`">NHunspell</a> Release Version $($context.Version)
</description>
</infos>]]>
</AppendText>
<!-- Update the version and dependencies versions in the NuSpec file -->
<NuSpecUpdate>
<NuSpec Path ="NHunspell.nuspec" />
</NuSpecUpdate>
<!-- Pack the NuGet package -->
<NuGetPack Path ="NHunspell.nuspec"/> 
</BuildSequence> 

The Complete-Build sequence depends on the Test-Build sequence, so the build can only be completed if successfully tested. In the Complete-Build sequence the Zip- and NuGet packages are created. As you can see some string values  contain PowerShell code which is escaped with the dollar sign ($) as usual in PowerShell. 

Publish-Build Sequence

<!-- Publishes the previously created build -->
<BuildSequence Name="Publish-Build" Depends="Test-Build" NewBuild="false">
<NuGetPush Path ="NHunspell.$($context.PackageVersion).nupkg" ApiKey="$($context.Credentials.NuGetApiKey)" Feed="$($context.Credentials.NuGetFeed)"/>
</BuildSequence> 
</BuildSequences>
</Solution>
</Solutions>
</BuildConfig> 

The Publish-Build sequence performs a publish step on our internal test NuGet feed.